Saturday, 31 October 2015

Android Basic Spinner Using ArrayAdapter

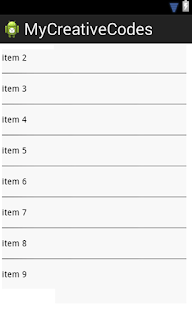
Spinner is the ordinary dropdown menu available for android. In this tutorial we are going to code a spinner using the arrayAdapter.
Android Basic Spinner Using ArrayAdapter

Java:
import java.util.ArrayList;  
 import android.app.Activity;  
 import android.os.Bundle;  
 import android.util.Log;  
 import android.view.View;  
 import android.widget.AdapterView;  
 import android.widget.ArrayAdapter;  
 import android.widget.Spinner;  
 public class MainActivity extends Activity implements  
           AdapterView.OnItemSelectedListener {  
      String itemValue;  
      Spinner spinnerOsversions;  
      public void addData() {     }  
      public void onCreate(Bundle bundle) {  
           super.onCreate(bundle);  
           setContentView(R.layout.activity_main);  
           ArrayList arrayList = new ArrayList();  
           arrayList.add("Item 1");  
           arrayList.add("Item 2");  
           arrayList.add("Item 3");  
           arrayList.add("Item 4");  
           arrayList.add("Item 5");  
           spinnerOsversions = (Spinner) findViewById(R.id.spinner1);  
           ArrayAdapter arrayAdapter = new ArrayAdapter(this, R.layout.simplerow,  
                     arrayList);  
           arrayAdapter.setDropDownViewResource(R.layout.simplerow);  
           spinnerOsversions.setAdapter(arrayAdapter);  
           spinnerOsversions  
                     .setOnItemSelectedListener((AdapterView.OnItemSelectedListener) this);  
      }  
      public void onItemSelected(AdapterView<?> adapterView, View view, int n,  
                long l) {  
           spinnerOsversions.setSelection(n);  
           String selectedItem = spinnerOsversions.getSelectedItem().toString();  
           Log.d("selected item ===", selectedItem);  
      }  
      public void onNothingSelected(AdapterView<?> adapterView) {  
      }  
 }  

XML:
simplerow.xml
<?xml version="1.0" encoding="utf-8"?>  
 <TextView xmlns:android="http://schemas.android.com/apk/res/android"  
   android:id="@id/rowTextView"  
   android:layout_width="fill_parent"  
   android:layout_height="wrap_content"  
   android:padding="10.0dip"  
   android:textSize="16.0sp" />  

activity_main.xml
<?xml version="1.0" encoding="utf-8"?>  
 <LinearLayout xmlns:android="http://schemas.android.com/apk/res/android"  
   android:layout_width="fill_parent"  
   android:layout_height="fill_parent"  
   android:orientation="vertical" >  
   <Spinner  
     android:id="@id/spinner1"  
     android:layout_width="fill_parent"  
     android:layout_height="wrap_content" />  
 </LinearLayout>       

That's all, now run our app!


Android ArrayAdapter Basic Listview

Their are several occations when you want to list something in your app, for example you the contacts in your android phone. In this tutorial you're gonna learn how to create a simple listview using ArrayAdapter.
Android ArrayAdapter Basic Listview

Copy the below code to your activity class:

Java:
 import android.app.Activity;  
 import android.content.Context;  
 import android.content.Intent;  
 import android.database.Cursor;  
 import android.database.sqlite.SQLiteDatabase;  
 import android.os.Bundle;  
 import android.view.View;  
 import android.widget.AdapterView;  
 import android.widget.ArrayAdapter;  
 import android.widget.ListAdapter;  
 import android.widget.ListView;  
 import android.widget.Toast;  
 import java.util.ArrayList;  
 import java.util.Arrays;  
 import java.util.Collection;  
 import java.util.List;  
 public class Accounts  
 extends Activity {  
   private static String DBNAME = "ROLLING.db";  
   String itemValue;  
   private ArrayAdapter<String> listAdapter;  
   private ListView mainListView;  
   SQLiteDatabase mydb;  
    @Override  
   public void onCreate(Bundle bundle) {  
     super.onCreate(bundle);  
    setContentView(R.layout.main_activity);  
    mainListView = (ListView)findViewById(R.id.list);  
     Object[] arrobject = new String[]{};  
     ArrayList arrayList = new ArrayList();  
     arrayList.addAll(Arrays.asList(arrobject));  
    listAdapter = new ArrayAdapter(this, R.layout.simplerow, arrayList);  
    listAdapter.add("Item 1 ");  
        listAdapter.add(Item 2);  
        listAdapter.add(Item 3);  
            listAdapter.add(Item 4);  
            listAdapter.add(Item 5);  
    mainListView.setAdapter(listAdapter);  
       mainListView.setOnItemClickListener((AdapterView.OnItemClickListener)new AdapterView.OnItemClickListener(){  
       public void onItemClick(AdapterView<?> adapterView, View view, int n, long l) {  
         itemValue = (String)mainListView.getItemAtPosition(n);  
         log.d("you clicked on ===", itemValue);  
       }  
     });  
   }  

XML:

simplerow.xml
<?xml version="1.0" encoding="utf-8"?>  
 <TextView xmlns:android="http://schemas.android.com/apk/res/android"  
   android:id="@id/rowTextView"  
   android:layout_width="fill_parent"  
   android:layout_height="wrap_content"  
   android:padding="10.0dip"  
   android:textSize="16.0sp" />  

main_activity.xml
 <?xml version="1.0" encoding="utf-8"?>  
 <LinearLayout xmlns:android="http://schemas.android.com/apk/res/android"  
   android:layout_width="fill_parent"  
   android:layout_height="fill_parent"  
   android:orientation="vertical" >  
    <ListView  
      android:id="@+id/list"  
      android:layout_width="fill_parent"  
      android:layout_height="fill_parent" />  
 </LinearLayout>  

That's all, now run your app!


Friday, 30 October 2015

Android connectiong to PHP and mysql

     This is my third tutorial on how you could connect your android device with server using php and mysql to store and retrieve data.
Android connectiong to PHP and mysql


Just copy and past the below code to your activity class file.

Java:
  private static String url_all_products = "http://vkcapp.in/app/get_all_products.php";  
 ArrayList<String>item1;  
 ArrayList<String>item2;  
 ArrayList<String>item3;  
      private static final String TAG_SUCCESS = "success";  
      private static final String TAG_PRODUCTS = "products";  
      JSONArray products = null;  
      // call this methode to invoke the connection to server     new LoadAllProducts().execute();  
      class LoadAllProducts extends AsyncTask<String, String, String> {  
           /**  
            * Before starting background thread Show Progress Dialog  
            * */  
           @Override  
           protected void onPreExecute() {  
                super.onPreExecute();  
                pDialog = new ProgressDialog(DataFetching.this);  
                pDialog.setMessage("Updating products index. Please wait...");  
                pDialog.setIndeterminate(false);  
                pDialog.setCancelable(false);  
                pDialog.show();  
 item1=new ArrayList<String>();  
 item2=new ArrayList<String>();  
 item3=new ArrayList<String>();  
           }  
           /**  
            * getting All products from url  
            * */  
           protected String doInBackground(String... args) {  
                List<NameValuePair> params = new ArrayList<NameValuePair>();  
                params.add(new BasicNameValuePair("state", state));  
                Log.d("sateId======", state);  
                JSONObject json = jParser.makeHttpRequest(url_all_products, "POST", params);  
                try {  
                     int success = json.getInt(TAG_SUCCESS);  
                     if (success == 1) {  
                          products = json.getJSONArray(TAG_PRODUCTS);  
                          for (int i = 0; i < products.length(); i++) {  
                               JSONObject c = products.getJSONObject(i);  
 item1.add(c.getString("item1"));  
 item2.add(c.getString("item2"));  
 item3.add(c.getString("item3"));  
                          }  
                     } else {  
                          Intent i = new Intent(getApplicationContext(),  
                                    MainActivity.class);  
                          // Closing all previous activities  
                          i.addFlags(Intent.FLAG_ACTIVITY_CLEAR_TOP);  
                          startActivity(i);  
                          finish();  
                     }  
                } catch (JSONException e) {  
                     e.printStackTrace();  
                }  
                return null;  
           }  
           /**  
            * After completing background task Dismiss the progress dialog  
            * **/  
           protected void onPostExecute(String file_url) {  
                // dismiss the dialog after getting all products  
                runOnUiThread(new Runnable() {  
                     public void run() {  
                          // add something here to perform after recieving data such us updating listview  
                     }  
                });  
           }  
      }  

Now you have to copy the php files from Android restful webservice call and get and parse json array using java ( assynchttp.jar ), php and mysql

Saturday, 24 October 2015

Android server socket example | connect multiple clients to the server using server socket connection

The server socket helps you to connect the clients with server. In this tutorial we are going to build a message delivering application in android using server socket in which you could connect multiple clients(android devices) to the server(PC).
android server socket example


Steps:
1. Create a java project and add the following classes

server.java
 import java.io.IOException;  
 import java.net.ServerSocket;  
 import java.net.Socket;  
 public class Server {  
 public static void main(String args[]){  
   Socket s=null;  
   ServerSocket ss2=null;  
   System.out.println("Server Listening......");  
   try{  
     ss2 = new ServerSocket(4444); // can also use static final PORT_NUM , when defined  
   }  
   catch(IOException e){  
   e.printStackTrace();  
   System.out.println("Server error");  
   }  
   while(true){  
     try{  
       s= ss2.accept();  
       System.out.println("connection Established");  
       Reciever st=new Reciever(s);  
       st.start();  
     }  
   catch(Exception e){  
     e.printStackTrace();  
     System.out.println("Connection Error");  
   }  
   }  
 }  
 }//class ends  

Sender.java
import java.io.IOException;  
 import java.io.PrintWriter;  
 import java.net.Socket;  
 public class Sender {  
   private PrintWriter out;  
   public Sender(Socket clientSocket) {  
     try {  
       out = new PrintWriter(clientSocket.getOutputStream(), true);  
     } catch (IOException e) {  
       e.printStackTrace();  
     }  
   }  
   public void sendMessage(String message) {  
        out.println(message); // Print the message on output stream.  
     out.flush();  
     message="";  
        System.out.println("Server: " + message + "\n"); // Print the message on chat window.  
   }  
 }  

Receiver.java
import java.io.BufferedReader;  
 import java.io.IOException;  
 import java.io.InputStreamReader;  
 import java.io.PrintWriter;  
 import java.net.Socket;  
 class Reciever extends Thread{   
   String line=null;  
   BufferedReader is = null;  
   PrintWriter os=null;  
   Socket s=null;  
   public Reciever(Socket s){  
     this.s=s;  
   }  
   public void run() {  
   try{  
     is= new BufferedReader(new InputStreamReader(s.getInputStream()));  
     os=new PrintWriter(s.getOutputStream());  
   }catch(IOException e){  
     System.out.println("IO error in server thread");  
   }  
   try {  
     line=is.readLine();  
     while(line.compareTo("QUIT")!=0){  
       os.println(line);  
       os.flush();  
       if(line.equals("syncDb")){  
            DataHandler a = new DataHandler();  
            a.syncDb(s);  
            break;  
       }  
       else{  
       //  
       System.out.println("Response to Client : "+line);  
       line=is.readLine();  
       }  
     }    
   } catch (IOException e) {  
     line=this.getName(); //reused String line for getting thread name  
     System.out.println("IO Error/ Client "+line+" terminated abruptly");  
   }  
   catch(NullPointerException e){  
     line=this.getName(); //reused String line for getting thread name  
     System.out.println("Client "+line+" Closed");  
   }  
   finally{    
   try{  
     System.out.println("Connection Closing..");  
     if (is!=null){  
       is.close();   
       System.out.println(" Socket Input Stream Closed");  
     }  
     if(os!=null){  
       os.close();  
       System.out.println("Socket Out Closed");  
     }  
     if (s!=null){  
     s.close();  
     System.out.println("Socket Closed");  
     }  
     }  
   catch(IOException ie){  
     System.out.println("Socket Close Error");  
   }  
   }//end finally  
   }  
 }  

DataHandler.Java
import java.net.Socket;  
 public class DataHandler {  
      public static void syncDb(Socket s) {  
           Sender sender = new Sender(s);  
           sender.sendMessage("***start***");  
           sender.sendMessage("This is a message from the server");  
           sender.sendMessage("***stop***");  
      }  
 }  

That's all for the server-side.

2.Copy and paste the below code to your android activity class.
import java.io.BufferedReader;  
 import java.io.IOException;  
 import java.io.InputStreamReader;  
 import java.io.PrintWriter;  
 import java.net.Socket;  
 import java.net.UnknownHostException;  
 import android.app.Activity;  
 import android.app.ProgressDialog;  
 import android.os.AsyncTask;  
 import android.os.Build;  
 import android.os.Bundle;  
 import android.util.Log;  
 import android.view.View;  
 import android.widget.Toast;  
 public class MainActivity extends Activity {  
      private Socket client;  
      private PrintWriter printwriter;  
      private BufferedReader bufferedReader;  
      private ProgressDialog pDialog;  
      String host;  
      int port;  
      @Override  
      protected void onCreate(Bundle savedInstanceState) {  
           super.onCreate(savedInstanceState);  
           setContentView(R.layout.activity_main);  
      }  
      /**  
       * This AsyncTask create the connection with the server and initialize the  
       * chat senders and receivers.  
       */  
      private class ChatOperator extends AsyncTask<Void, Void, Void> {  
           @Override  
           protected Void doInBackground(Void... arg0) {  
                try {  
                     client = new Socket(host, port); // Creating the  
                                                                            // server socket.  
                     if (client != null) {  
                          printwriter = new PrintWriter(client.getOutputStream(),  
                                    true);  
                          InputStreamReader inputStreamReader = new InputStreamReader(  
                                    client.getInputStream());  
                          bufferedReader = new BufferedReader(inputStreamReader);  
                     } else {  
                          System.out  
                                    .println("Server has not bean started on port 4444.");  
                     }  
                } catch (UnknownHostException e) {  
                     System.out.println("Faild to connect server " + host);  
                     e.printStackTrace();  
                } catch (IOException e) {  
                     System.out.println("Faild to connect server " + host);  
                     e.printStackTrace();  
                }  
                return null;  
           }  
           /**  
            * Following method is executed at the end of doInBackground method.  
            */  
           @Override  
           protected void onPostExecute(Void result) {  
                final Sender messageSender = new Sender(); // Initialize chat sender  
                // AsyncTask.  
                if (Build.VERSION.SDK_INT >= Build.VERSION_CODES.HONEYCOMB) {  
                     messageSender.executeOnExecutor(AsyncTask.THREAD_POOL_EXECUTOR);  
                } else {  
                     messageSender.execute();  
                }  
                Receiver receiver = new Receiver(); // Initialize chat receiver  
                                                             // AsyncTask.  
                receiver.execute();  
           }  
      }  
      /**  
       * This AsyncTask continuously reads the input buffer and show the chat  
       * message if a message is availble.  
       */  
      private class Receiver extends AsyncTask<Void, Void, Void> {  
           private String message;  
           @Override  
           protected Void doInBackground(Void... params) {  
                while (true) {  
                     try {  
                          if (bufferedReader.ready()) {  
                               message = bufferedReader.readLine();  
                               publishProgress(null);  
                          }  
                     } catch (UnknownHostException e) {  
                          e.printStackTrace();  
                     } catch (IOException e) {  
                          e.printStackTrace();  
                     }  
                     try {  
                          Thread.sleep(100);  
                     } catch (InterruptedException ie) {  
                     }  
                }  
           }  
           @Override  
           protected void onProgressUpdate(Void... values) {  
                try {  
                     Toast.makeText(getApplicationContext(),  
                               "Received message: "+message, Toast.LENGTH_LONG).show();  
                } catch (Exception e) {  
                     // TODO: handle exception  
                }  
           }  
      }  
      /**  
       * This AsyncTask sends the chat message through the output stream.  
       */  
      private class Sender extends AsyncTask<Void, Void, Void> {  
           @Override  
           protected Void doInBackground(Void... params) {  
                printwriter.write("message from client" + "\n");  
                printwriter.flush();  
                Log.d("message", "send");  
                return null;  
           }  
           @Override  
           protected void onPostExecute(Void result) {  
           }  
      }  
      public void LoadAndSave(View v) {  
           pDialog = new ProgressDialog(MainActivity.this);  
           pDialog.setMessage("Loading meassage. Please wait...");  
           pDialog.setIndeterminate(false);  
           pDialog.setCancelable(false);  
           pDialog.show();  
           ChatOperator chatOperator = new ChatOperator();  
           chatOperator.execute();  
      }  
 }// activity ends  

3. Copy and paste the below xml to you layout xml file.
<ScrollView xmlns:android="http://schemas.android.com/apk/res/android"  
   android:layout_width="fill_parent"  
   android:layout_height="fill_parent"  
   >  
   <TableLayout  
     android:layout_width="fill_parent"  
     android:layout_height="172dp"  
     android:stretchColumns="1" >  
     <Button  
       android:id="@+id/button1"  
       android:layout_width="wrap_content"  
       android:layout_height="wrap_content"  
       android:layout_marginBottom="20dp"  
       android:layout_marginTop="20dp"  
       android:onClick="LoadAndSave"  
       android:text="send a message to server" />  
   </TableLayout>  
 </ScrollView>  

4.Finally add internet permission to your android manifest.
<uses-permission android:name="android.permission.INTERNET" >

Now run the server and connect as much as client!


JavaMail Tutorial | How to read received mail

     JavaMail helps you to connect your mailing service with your custom software! In this tutorial  you are gonna use javamail to fetch the revieved mails and once received the mail is set to read.


Steps:
1.Download and add javamail library to your project!
2.Copy past the below java code to your class file.


Java:
 import java.io.IOException;  
 import java.io.InputStream;  
 import java.util.Properties;  
 import java.util.concurrent.Executors;  
 import java.util.concurrent.ScheduledExecutorService;  
 import java.util.concurrent.TimeUnit;  
 import java.util.logging.Handler;  
 import javax.mail.Address;  
 import javax.mail.BodyPart;  
 import javax.mail.Flags;  
 import javax.mail.Folder;  
 import javax.mail.Message;  
 import javax.mail.MessagingException;  
 import javax.mail.Multipart;  
 import javax.mail.NoSuchProviderException;  
 import javax.mail.PasswordAuthentication;  
 import javax.mail.Session;  
 import javax.mail.Store;  
 import javax.mail.Flags.Flag;  
 import javax.mail.search.FlagTerm;  
 public class ReceiveMail {  
   Properties properties = null;  
   private Session session = null;  
   private Store store = null;  
   private Folder inbox = null;  
   private String userName = "XXXXXX@XXXXXX.com";// provide user name  
   private String password = "XXXXXXXXXX";// provide password  
   public ReceiveMail() {  
   }  
   public void readMails() {  
     properties = new Properties();  
     properties.setProperty("mail.host", "imap.gmail.com");  
     properties.setProperty("mail.port", "995");  
     properties.setProperty("mail.transport.protocol", "imaps");  
     session = Session.getInstance(properties,  
         new javax.mail.Authenticator() {  
           protected PasswordAuthentication getPasswordAuthentication() {  
             return new PasswordAuthentication(userName, password);  
           }  
         });  
     try {  
       store = session.getStore("imaps");  
       store.connect();  
       inbox = store.getFolder("INBOX");  
       inbox.open(Folder.READ_WRITE);  
       // search for all "unseen" messages  
       Flags seen = new Flags(Flags.Flag.SEEN);  
       FlagTerm unseenFlagTerm = new FlagTerm(seen, false);  
       Message messages[] = inbox.search(unseenFlagTerm);  
 //      Message messages[] = inbox.search(new FlagTerm(  
 //          new Flags(Flag.RECENT), false));  
 //        
       System.out.println("Number of mails = " + messages.length);  
                      for (int i = 0; i < messages.length; i++) {  
         Message message = messages[i];  
         Address[] from = message.getFrom();  
         System.out.println("-------------------------------");  
         System.out.println("Date : " + message.getSentDate());  
         System.out.println("From : " + from[0]);  
         System.out.println("Subject: " + message.getSubject());  
         System.out.println("Content : ");  
         processMessageBody(message);  
         System.out.println("--------------------------------");  
       }  
       inbox.close(true);  
       store.close();  
     } catch (NoSuchProviderException e) {  
       e.printStackTrace();  
     } catch (MessagingException e) {  
       //e.printStackTrace();  
          System.out.println("please connect to internet!");  
     }  
   }  
   public void processMessageBody(Message message) {  
     try {  
       Object content = message.getContent();  
       // check for string  
       // then check for multipart  
       if (content instanceof String) {  
         System.out.println(content);  
       } else if (content instanceof Multipart) {  
         Multipart multiPart = (Multipart) content;  
         procesMultiPart(multiPart);  
       } else if (content instanceof InputStream) {  
         InputStream inStream = (InputStream) content;  
         int ch;  
         while ((ch = inStream.read()) != -1) {  
           System.out.write(ch);  
         }      }  
     } catch (IOException e) {  
       e.printStackTrace();  
     } catch (MessagingException e) {  
       e.printStackTrace();  
     }  
   }  
   public void procesMultiPart(Multipart content) {  
     try {  
       int multiPartCount = content.getCount();  
       for (int i = 0; i < multiPartCount; i++) {  
         BodyPart bodyPart = content.getBodyPart(i);  
         Object o;  
         o = bodyPart.getContent();  
         if (o instanceof String) {  
              String[] splited = o.toString().split("<div");  
                       String msg = splited[0];  
                       if(!msg.equals(""))  
           System.out.println(msg);  
         } else if (o instanceof Multipart) {  
           procesMultiPart((Multipart) o);  
         }  
       }  
     } catch (IOException e) {  
       e.printStackTrace();  
     } catch (MessagingException e) {  
       e.printStackTrace();  
     }  
   }  
   public static void notifier(){  
        Runnable helloRunnable = new Runnable() {  
          public void run() {  
            // System.out.println("Hello world");  
                ReceiveMail sample = new ReceiveMail();  
             sample.readMails();  
          }  
        };  
        ScheduledExecutorService executor = Executors.newScheduledThreadPool(1);  
        executor.scheduleAtFixedRate(helloRunnable, 0, 3, TimeUnit.SECONDS);   
   }  
   public static void main(String[] args) {  
        notifier();  
   }  
 }  


Android restful webservice call and get and parse json array using java ( assynchttp.jar ), php and mysql

      In this tutorial we are gonna use android-async-http-library to create a restful webservice call, And get and parse the JSON array data. We will cover the Java codes for the android and PHP codes to manage the server-side. Also we will connect PHP with MySql to load data from the database!


Steps involved:
1.Download and add android-async-http-library to your project.
2.Writing java codes.
3.Copy and paste the xml codes.
4.Creating PHP pages to manage the server side.
5. And finally check your console log for the received JSON data. 

Java:

MainActivity.java
 import org.json.JSONArray;   
  import org.json.JSONException;   
  import org.json.JSONObject;   
  import android.app.Activity;   
  import android.os.Bundle;   
  import android.util.Log;   
  import android.widget.Toast;   
  import com.loopj.android.http.AsyncHttpClient;   
  import com.loopj.android.http.AsyncHttpResponseHandler;   
  import com.loopj.android.http.RequestParams;   
  public class MainActivity extends Activity {   
    JSONArray products = null;   
    String PHP_File_Path = "http://google.com/getData.php";   
    @Override   
    protected void onCreate(Bundle savedInstanceState) {   
       super.onCreate(savedInstanceState);   
       setContentView(R.layout.main_activity);   
       doCall("Mycreativecodes", PHP_File_Path);   
    }   
    public void doCall(String username, String path) {   
       AsyncHttpClient client = new AsyncHttpClient();   
       RequestParams params;   
       params = new RequestParams();   
       params.put("username", username);   
       client.post(path, params,   
            new AsyncHttpResponseHandler() {   
              @Override   
              public void onSuccess(String response) {   
                 System.out.println(response);   
                 try {   
                   JSONObject arrg = new JSONObject(response);   
                   System.out.println(arrg.getInt("success"));   
                   if (arrg.getInt("success") == 1) {   
                        for (int i = 0; i < products.length(); i++) {   
                           JSONObject c = products.getJSONObject(i);   
                           String value1 = c.getString("value1");   
                           String value2 = c.getString("value2");   
                           String value3 = c.getString("value3");   
                        Log.d("value1=", value1);   
                        Log.d("value2=", value2);   
                        Log.d("value3=", value3);   
                        }   
                   } else {   
                      Toast.makeText(getApplicationContext(),   
                           "No data found!", Toast.LENGTH_LONG)   
                           .show();   
                      finish();   
                   }   
                 } catch (JSONException e) {   
                   Toast.makeText(   
                        getApplicationContext(),   
                        "Error Occured [Server's JSON response might be invalid]!",   
                        Toast.LENGTH_LONG).show();   
                   e.printStackTrace();   
                 }   
              }   
              @Override   
              public void onFailure(int statusCode, Throwable error,   
                   String content) {   
                 if (statusCode == 404) {   
                   Toast.makeText(getApplicationContext(),   
                        "Requested page not found",   
                        Toast.LENGTH_LONG).show();   
                 } else if (statusCode == 500) {   
                   Toast.makeText(getApplicationContext(),   
                        "Something went wrong at server side",   
                        Toast.LENGTH_LONG).show();   
                 } else {   
                   Toast.makeText(   
                        getApplicationContext(),   
                        "Unexpected Error occcured! (Most common Error: Device might not be connected to Internet)",   
                        Toast.LENGTH_LONG).show();   
                 }   
              }   
            });   
    }   
  }   
That's all for the android part!

PHP:
getData.php
 <?php  
 /*  
  * Following code will list all the products  
  */  
 // array for JSON response  
 $response = array();  
 $status=0;  
 $isUserPresent=0;  
 // include db connect class  
 require_once __DIR__ . '/db_connect.php';  
 // connecting to db  
 $db = new DB_CONNECT();  
 if (isset($_POST['username'])) {  
   $masterId = $_POST['username'];  
 // get all products from products table  
 $result = mysql_query("SELECT * FROM incoming where tomaster = '$masterId'") or die(mysql_error());  
 // check for empty result  
 if (mysql_num_rows($result) > 0) {  
   // looping through all results  
   // products node  
   $response["products"] = array();  
   while ($row = mysql_fetch_array($result)) {  
     // temp user array  
     $product = array();  
     $product["id"] = $row["id"];  
     $product["frommaster"] = $row["frommaster"];  
     $product["description"] = $row["description"];  
     $product["amount"] = $row["amount"];  
     $product["date"] = $row["DATE1"];  
     // push single product into final response array  
     array_push($response["products"], $product);  
   }  
   // success  
   $response["success"] = 1;  
   // echoing JSON response  
   echo json_encode($response);  
  } else {  
   // no products found  
   $response["success"] = 0;  
   $response["message"] = "No user found";  
   // echo no users JSON  
   echo json_encode($response);  
     }  
 }else{  
  // required field is missing  
   $response["success"] = 0;  
   $response["message"] = "Required field(s) is missing";  
   // echoing JSON response  
   echo json_encode($response);  
 }  
 ?>  

db_connect.php
 <?php  
 /*  
 we are connecting to the database using the information in db_config.php file  
 */  
 class DB_CONNECT {  
   function __construct() {  
     $this->connect();  
   }  
   function __destruct() {  
     $this->close();  
   }  
   function connect() {  
     require_once __DIR__ . '/db_config.php';  
     $con = mysql_connect(DB_SERVER, DB_USER, DB_PASSWORD) or die(mysql_error());  
     $db = mysql_select_db(DB_DATABASE) or die(mysql_error()) or die(mysql_error());  
     return $con;  
   }  
   function close() {  
     mysql_close();  
   }  
 }  
 ?>  

db_config.php
 <?php  
 /*  
  * All database connection details  
  */  
 define('DB_USER', "root"); // your database username  
 define('DB_PASSWORD', "root"); // your database password  
 define('DB_DATABASE', "mydb"); // your database name  
 define('DB_SERVER', "localhost"); // your database server  
 ?>  

That's all, the login system is completed. Your questions maybe dropped as comments. Thankyou!


Thursday, 22 October 2015

Shared Preferences in Android : Saving and retrieving stored data in sharedPreferences

       Their are several ways to store data in your android device, mainly using SQlite Database and shared Preferences. The data's are stored in shared Preferences key n value pair.

       Each key points to its value. You could add, delete or update sharedPreferences  by using the pointing key. In this tutorial you're gonna learn how to use shared Preference in android.

  In order to use shared Preference in android you have to Create and initialize sharedPreferences:
 SharedsharedPreferenceserences sharedPreferences = getApplicationContext().getSharedsharedPreferenceserences("userSharedPreferences", MODE_PRIVATE);   
   xEditor xEditor = sharedPreferences.edit();  

Inserting data as key n value form:
 xEditor.putBoolean("key_x_1", true);      // Store boolean : true or false  
   xEditor.putInt("key_x_2", "int_value");    // Store integer  
   xEditor.putFloat("key_x_3", "float_value");  // Store float  
   xEditor.putLong("key_x_4", "long_value");   // Store long  
   xEditor.putString("key_x_5", "string_value"); // Store string  
   // save changes  
   xEditor.commit(); // saving changes  

Retrieving / Fetching data stored in sharedPreferences:
*If the key doesn't posses any_value then the second parameter is saved as a new falue for the respective key!
 sharedPreferences.getBoolean("key_x_1", null);     // fetching boolean  
   sharedPreferences.getInt("key_x_2", null);       // fetching Integer  
   sharedPreferences.getFloat("key_x_3", null);      // fetching Float  
   sharedPreferences.getLong("key_x_4", null);      // fetching Long  
   sharedPreferences.getString("key_x_5", null);     // fetching String  

Removing / Deleting Key and its Value from sharedPreferences:
 xEditor.remove("key_x_3"); // will delete key key_x_3  
   xEditor.remove("key_x_4"); // will delete key key_x_4  
   // Save the changes in SharedsharedPreferenceserences  
   xEditor.commit(); // commit changes  

Clearing / deleting all entries from sharedPreferences:
 xEditor.clear();  
    xEditor.commit(); // commit changes  


Tuesday, 20 October 2015

Download Blackmart Alpha for free

Everyone like to have a free test version of paid android apps, so that they could test the app before buying it. But many of the developers does not publish lite free version of their android app and the PlayStore users are forced to download and use it without getting a chance to test it before buying the app and here comes the role of Blackmart Alpha. Blackmart Alpha is free andoid app, from which you could download PlayStore(paid) apps for free and if your a satisfied with the downloaded app then you could purchase it via PlayStore to legally own it. Blackmart alpha is not available in PlayStore but the apk file is present widely in the internet. Piracy is not at all promoted, so make sure you purchase the app if you are interested.
blackmart alpha


Sunday, 18 October 2015

Android restful webservice call and get and parse json data : Login example with php mysql

Most of the mobile apps requires user registration and login. In this tutorial I'm gonna guide you to create a login system for android using the android-async-http-library, which will also store the user login information in local sqlite database.


android login tutorial with php mysql


Steps included are:
1.Creating an xml layout file.
2.Download and add android-async-http-library  to your project.
3.Writing java codes for getting and sending the username and         password from user to server.
4.Writing PHP codes to manage server-side.

copy and paste the below xml to your layout xml file.

XML:
 <RelativeLayout xmlns:android="http://schemas.android.com/apk/res/android"  
   xmlns:tools="http://schemas.android.com/tools"  
   android:layout_width="match_parent"  
   android:layout_height="match_parent"  
   android:paddingBottom="@dimen/activity_vertical_margin"  
   android:paddingLeft="@dimen/activity_horizontal_margin"  
   android:paddingRight="@dimen/activity_horizontal_margin"  
   android:paddingTop="@dimen/activity_vertical_margin" >  
   <Button  
     android:id="@+id/resetbtn"  
     android:layout_width="100dp"  
     android:layout_height="55dp"  
     android:background="@drawable/bluebutton"  
     android:textColor="#fff"  
     android:textStyle="bold"   
     android:layout_below="@+id/password"  
     android:layout_centerHorizontal="true"  
     android:onClick="register"  
     android:text="Signup" />  
   <EditText  
     android:id="@+id/username"  
     android:layout_width="wrap_content"  
     android:layout_height="wrap_content"  
     android:layout_alignParentTop="true"  
     android:layout_centerHorizontal="true"  
     android:layout_marginTop="78dp"  
     android:ems="10"  
     android:hint="Username" >  
       <EditText  
     android:id="@+id/password"  
     android:layout_width="wrap_content"  
     android:layout_height="wrap_content"  
     android:layout_alignParentTop="true"  
     android:layout_centerHorizontal="true"  
     android:layout_marginTop="78dp"  
       android:inputType="numberPassword"  
     android:ems="10"  
     android:hint="Password" >  
     <requestFocus />  
   </EditText>  
 </RelativeLayout>  


Java:
 package in.creativecodes.loginExample;  
 import org.json.JSONException;  
 import org.json.JSONObject;  
 import com.loopj.android.http.AsyncHttpClient;  
 import com.loopj.android.http.AsyncHttpResponseHandler;  
 import com.loopj.android.http.RequestParams;  
 import in.wizzo.dataflasher.R;  
 import in.wizzo.dataflasher.R.layout;  
 import in.wizzo.dataflasher.R.menu;  
 import android.os.Bundle;  
 import android.app.Activity;  
 import android.content.Intent;  
 import android.database.sqlite.SQLiteDatabase;  
 import android.view.Menu;  
 import android.view.View;  
 import android.widget.EditText;  
 import android.widget.Toast;  
 public class Login extends Activity {  
      private static String DBNAME = "myCreativeCodes.db";  
      SQLiteDatabase mydb;  
      String username,password;  
      @Override  
      protected void onCreate(Bundle savedInstanceState) {  
           super.onCreate(savedInstanceState);  
           setContentView(R.layout.activity_login);  
      }  
      public void login(View v) {  
           EditText editText = (EditText) findViewById(R.id.username);  
           username = editText.getText().toString();  
           EditText editText2 = (EditText) findViewById(R.id.password);  
           password = editText2.getText().toString();  
           check();  
      }  
      public void check() {  
           // Create AsycHttpClient object  
           AsyncHttpClient client = new AsyncHttpClient();  
           RequestParams params;  
           // prgDialog.show();  
           params = new RequestParams();  
           params.put("username", username);  
           params.put("password", password);  
           client.post("MYDOMAIN.COM/LOGIN.PHP", params,  
                     new AsyncHttpResponseHandler() {  
                          @Override  
                          public void onSuccess(String response) {  
                               System.out.println(response);  
                               // prgDialog.hide();  
                               try {  
                                    JSONObject arr = new JSONObject(response);  
                                    System.out.println(arr.getInt("success"));  
                                    if (arr.getInt("success") == 1) {  
                                         try {  
                                              mydb = openOrCreateDatabase(DBNAME, 0, null);  
                                              mydb.execSQL("CREATE TABLE IF NOT EXISTS INFO (ID INTEGER PRIMARY KEY, PASSWORD TEXT, USERNAME TEXT);");  
                                              mydb.close();  
                                              mydb = openOrCreateDatabase(DBNAME, 0, null);  
                                              mydb.execSQL("INSERT INTO INFO(USERNAME, PASSWORD) VALUES('"  
                                                        + username + "' , '"+password+"')");  
                                              mydb.close();  
                                              Toast.makeText(getApplicationContext(),  
                                                        "You Had Successfully Registered!",  
                                                        1).show();  
                                              finish();  
                                         } catch (Exception var10_10) {  
                                              Toast.makeText(getApplicationContext(),  
                                                        var10_10.toString(), 1).show();  
                                              return;  
                                         }  
                                    } else {  
                                         Toast.makeText(getApplicationContext(),  
                                                   "Invalid UserName Or Password!", Toast.LENGTH_LONG)  
                                                   .show();  
                                    }  
                               } catch (JSONException e) {  
                                    // TODO Auto-generated catch block  
                                    Toast.makeText(  
                                              getApplicationContext(),  
                                              "Error Occured [Server's JSON response might be invalid]!",  
                                              Toast.LENGTH_LONG).show();  
                                    e.printStackTrace();  
                               }  
                          }  
                          @Override  
                          public void onFailure(int statusCode, Throwable error,  
                                    String content) {  
                               // TODO Auto-generated method stub  
                               // prgDialog.hide();  
                               if (statusCode == 404) {  
                                    Toast.makeText(getApplicationContext(),  
                                              "Requested resource not found",  
                                              Toast.LENGTH_LONG).show();  
                               } else if (statusCode == 500) {  
                                    Toast.makeText(getApplicationContext(),  
                                              "Something went wrong at server end",  
                                              Toast.LENGTH_LONG).show();  
                               } else {  
                                    Toast.makeText(  
                                              getApplicationContext(),  
                                              "Please connect to Internet and try again!",  
                                              Toast.LENGTH_LONG).show();  
                               }  
                          }  
                     });  
      }  
 }  

PHP:

login.php

 <?php  
 // array for JSON response  
 $response = array();  
 // include db connect class  
 require_once __DIR__ . '/db_connect.php';  
 // connecting to db  
 $db = new DB_CONNECT();  
 // check for post data  
 if (isset($_POST['username']) && isset($_POST['password'])) {  
   $username = $_POST['username'];  
   $password = $_POST['password'];  
   // get a product from products table  
   $result = mysql_query("SELECT * FROM users WHERE USERNAME = '$username' AND PASSWORD = '$password'");  
   if (!empty($result)) {  
     // check for empty result  
     if (mysql_num_rows($result) > 0) {  
       $response["success"] = 1;  
       // echoing JSON response  
       echo json_encode($response);  
     } else {  
       // no product found  
       $response["success"] = 0;  
       $response["message"] = "No user found";  
       // echo no users JSON  
       echo json_encode($response);  
     }  
   } else {  
     // no product found  
     $response["success"] = 0;  
     $response["message"] = "No user found";  
     // echo no users JSON  
     echo json_encode($response);  
   }  
 } else {  
   // required field is missing  
   $response["success"] = 0;  
   $response["message"] = "Required field(s) is missing";  
   // echoing JSON response  
   echo json_encode($response);  
 }  
 ?>  

db_connect.php
 <?php  
 /*  
 we are connecting to the database using the information in db_config.php file  
 */  
 class DB_CONNECT {  
   function __construct() {  
     $this->connect();  
   }  
   function __destruct() {  
     $this->close();  
   }  
   function connect() {  
     require_once __DIR__ . '/db_config.php';  
     $con = mysql_connect(DB_SERVER, DB_USER, DB_PASSWORD) or die(mysql_error());  
     $db = mysql_select_db(DB_DATABASE) or die(mysql_error()) or die(mysql_error());  
     return $con;  
   }  
   function close() {  
     mysql_close();  
   }  
 }  
 ?>  

db_config.php
 <?php  
 /*  
  * All database connection details  
  */  
 define('DB_USER', "root"); // your database username  
 define('DB_PASSWORD', "root"); // your database password  
 define('DB_DATABASE', "mydb"); // your database name  
 define('DB_SERVER', "localhost"); // your database server  
 ?>  

That's all, the login system is completed. Your questions maybe dropped as comments. Thankyou!


Saturday, 17 October 2015

Android: Alert using 'Toast' and 'Alert Dialogue'

   Alert has a wide number of uses in every app such as to show 'exit confirmation', 'do you want to continue', to show offers, etc... the endless uses of alert continues.. In android platform we have mainly to kinds of alert which are 'toast' and  alert using 'Builder'

Alert Dialogue 
   Its a bit advanced alert which popups and disappears after user action. You could have a title, message and buttons
in it.


   Consider the below code! Replace the MainActivity with your activity, "Confirm Exit..." with your title and "Are you sure to exit?" with your description. "YES" and "NO" are the texts to be shown on the buttons.

In the below code you could also call your methods which you want to trigger on pressing respective buttons.


Java:
 public void rYouSureToExit() {  
           Builder var6 = new Builder(MainActivity.this);  
           var6.setTitle("Confirm Exit...");  
           var6.setMessage("Are you sure to exit?");  
           var6.setPositiveButton("YES",  
                     new android.content.DialogInterface.OnClickListener() {  
                          public void onClick(DialogInterface var1, int var2) {  
                               finish();  
                          }  
                     });  
           var6.setNegativeButton("NO",  
                     new android.content.DialogInterface.OnClickListener() {  
                          public void onClick(DialogInterface var1, int var2) {  
                               var1.cancel();  
                          }  
                     });  
           var6.show();  
      }  

Toast
 Its a simple alert which popups and disappears after a fixed time. You could add a message body to it.


Java:
 Toast.makeText(getApplicationContext(),"This is a toast!", 1).show();  


IOS: Executing a function in main queue using swift

      Sometimes our application will have multi queues, if so then you will have to be more careful about running your code on respective queues since a code that has to be run on a main queue wont run on another queues; mainly background queues. In this tutorial you're gonna learn how to send the codes to main queue from an another in swift for your ios app. 

      If you want to achieve something in your main queue(thread) from a background queue add the below code to you background queue. consider a case that you wont be able to show alert (which has to run on a main queue) from the dataTaskWithRequest() as it works on an another queue and here you have to call the alert from inside the below code.

Swift:
dispatch_async(dispatch_get_main_queue()) { () -> Void in  
 // add your code here  
 }  

Its really simple with swift isn't it!

IOS: Perform the segue programmatically

      In most of your ios apps you will be having more than one window and will also have cases that you want to switch from your current viewController to another viewController. you could achieve it by just ctrl+dragging from your button in first viewController to second view control and selecting 'show' option from the popup menu.

      But their are cases when you want to segue from one to another programatically without a button click. In such cases you will have to ctrl+drag from the first viewController to second viewController and select 'show' option from the popup menu and set an identifier for the newly added segue. And now you have to copy past the below code to your programe where you want to perform the segue programmatically. Dont forget to replace the identifier in the sample code with your segue identifier or else the app will crash.

Swift:
 self.performSegueWithIdentifier("<Segue_Identifier>" ,sender: self)  

If it doesn't work then try:
 self.shouldPerformSegueWithIdentifier("<Segue_Identifier>" ,sender: self)  

Its really cool with swift isn't it!


IOS: Showing alert in ios apps using swift

         Most of the mobile apps will be having an alert to show different kinds of messages such as to show offers, report errors, to remind about empty text fields and etc.. In this tutorial youre gonna learn how to show alert in your ios app using swift. 

         In the below code replace 'TITLE' with your alert box title and 'DESCRIPTION' with your alert message.Also you could add your custom code to be executed when the user presses the 'OK' button.

Swift:
let myAlert = UIAlertController(title: "TITLE", message: "DESCRIPTION", preferredStyle: .Alert)  
               var actionOnOk = UIAlertAction(title: "OK", style: UIAlertActionStyle.Default) {  
                 UIAlertAction in  
               //add your code here to execute while clicking ok button  
               }  
               myAlert.addAction(actionOnOk)  
               self.presentViewController(myAlert, animated: true, completion: nil)  

IOS: Creating a login in ios using swift and backend with php Mysql

        The use of login page will be necessary when you limit the user access to you app for only registered users. In this tutorial we are going to post an http request to the server and get the response and process it.
        You will have to create three php pages to handle the server side, you could collect the code for the php pages from my last ios post: Make an http request from the ios device using swift and also receiving a response as a json array from the server-side PHP Mysql.


Swift:
 func post() {  
   var username="USERNAME" //replace with your username  
      var password="PASSWORD" //replace with your password  
   var session = NSURLSession.sharedSession()  
   let request = NSMutableURLRequest(URL: NSURL(string: "<The address to the login php page>")!)  
   request.HTTPMethod = "POST"  
   request.addValue("application/x-www-form-urlencoded", forHTTPHeaderField: "Content-Type")  
   request.addValue("application/json", forHTTPHeaderField: "Accept")  
   let postString = "&username=\(username)&password=\(password)"  
   request.HTTPBody = postString.dataUsingEncoding(NSUTF8StringEncoding)  
   var task = session.dataTaskWithRequest(request, completionHandler: {data, response, error -> Void in  
     println("Response: \(response)")  
     var dataString = NSString(data: data, encoding: NSUTF8StringEncoding)  
     println("Body: \(dataString)")  
     var err: NSError?  
     var json = NSJSONSerialization.JSONObjectWithData(data, options: .MutableLeaves, error: &err) as? NSDictionary  
     // checking whether JSONObjectWithData constructor return an error?   
     if(err != nil) {  
       println(err!.localizedDescription)  
       let jsonString = NSString(data: data, encoding: NSUTF8StringEncoding)  
       println("Error could not parse JSON: '\(jsonString)'")  
     }  
     else {  
       // checking for value in the response json  
       if let parseJSON = json {  
         // retrieving the parsed json data for the key 'success'  
         var success = parseJSON["success"] as? Int  
         println("Succes: \(success)")  
       }  
       else {  
         // catching the error  
         let jsonString = NSString(data: data, encoding: NSUTF8StringEncoding)  
         println("Something went wrong, Error could not parse JSON: \(jsonString)")  
       }  
     }  
   })  
   task.resume()  
 }